


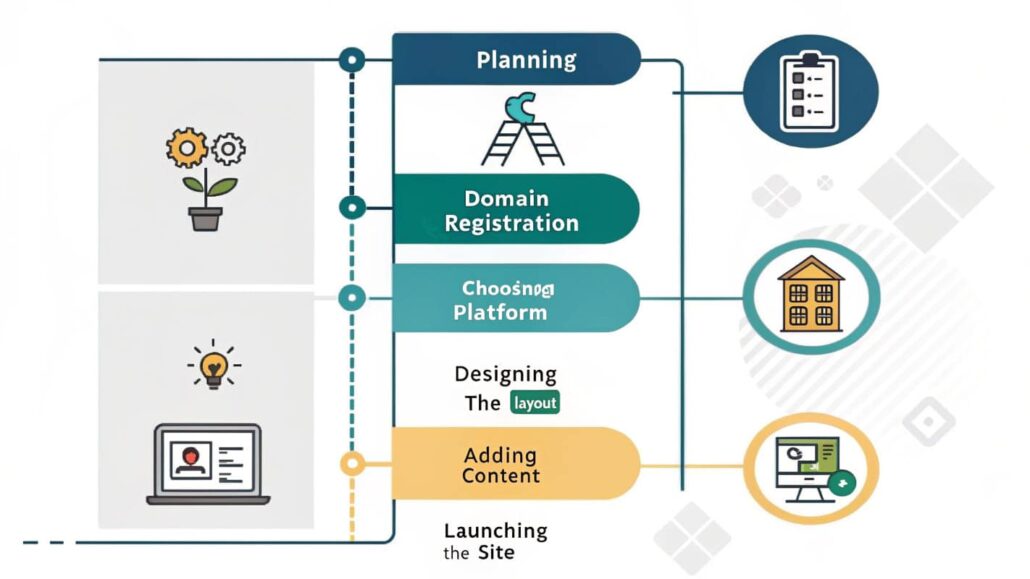
How to Build a Website from Scratch
Starting your very own website can seem overwhelming, especially if you have no code or design background, but it is a lot less scary once you break it down into clear steps. Armed with the right tools and a bit of patience, you can turn your idea-a blog, an online store, or a portfolio-into a living site that sits on the internet 24/7. This guide will take you from the very first brainstorm to clicking that exciting Publish button, step by step.
In the sections that follow, you will learn:
- How to map out your site so visitors find what they need fast. – The software, services, and budget you actually need to get started. – A straightforward, hands-on process for building, designing, and launching your site.
By the time you reach the last tip, you will have everything required to spark your own professional-looking website-without hiring an expensive developer.
Step 1: Define the Purpose of Your Website
Before you open any app, sit down and answer one simple question: Why does this website need to exist?
Questions to Define Your Purpose
- Will your site simply show off your portfolio, like for a designer or writer?
- Are you planning to sell stuff through an online store?
- Is it mostly a blog, or do you want it to be an info hub?
- Do you need contact forms, booking calendars, or a sign-up for newsletters?
Take a minute to write down what you actually want it to do. For example:
- Main goal: Land freelance graphic design clients.
- Side goals: Show my work and make it super easy for people to reach me.
Clear goals keep your site focused and stop it from getting crowded with fancy extras.
Step 2: Choose the Right Platform
The platform you pick can turn building a site into a breeze-or a headache. Luckily, there are choices for every skill level.
Popular Platforms
- WordPress: Great for blogs, portfolios, and any flexible site. With thousands of free plugins, you can tweak almost anything. If you like digging into settings and code, this open-source giant is for you.
- Wix or Squarespace: Perfect for total beginners. Both use drag-and-drop editors and ready-made templates. They shine for small business pages or simple portfolio sites.
- Shopify: The top pick when you want to sell online. Everything-from payment links to inventory management-is built with shoppers in mind.
Decide on Your Build Option
- Custom HTML/CSS. If youre comfy coding and want total creative power, you can start from zero with HTML, CSS, and a sprinkle of JavaScript.
- Tip. Pick a platform that matches your end goal. Planning to sell a lot? Shopify is usually smarter than WordPress for that.
Step 3 Secure Your Domain Name
Your domain is your sites home address (think www.mywebsite.com), so give it thought before you buy.
- Keep it short and easy to remember.
- Skip numbers and odd symbols.
- Grab your brand name if its free.
- Pick a fitting ending; .com, .org, and .net still rule, but .io and .shop are trending.
You can buy your domain from familiar places like: GoDaddy, Namecheap, or Bluehost. Most domains cost about $10 to $15 a year; premium names, however, can run into the hundreds or even thousands.
Pro Tip:
If your dream domain is already in use, try tacking on a word that fits your business. So instead of giving up on brightsolutions.com, you could register brightsolutionsdesign.com and still keep the brand strong.
Step 4: Pick a Hosting Provider
A good host stores your site files and makes them visible on the web. Builders like Wix and Squarespace bundle hosting with their plans, so you don’t have to think about it. If you go with WordPress.org or a custom setup, though, finding a separate host is a must.
Types of Hosting:
- Shared Hosting This budget-friendly option packs your site onto the same server as many others. It works fine for beginners. Names like Bluehost and HostGator are popular for solid shared plans.
- Dedicated Hosting Here your site owns the whole server, so speed and performance get a nice boost. Its higher price makes it better for sites that already pull big crowds.
- Managed WordPress Hosting Built just for WordPress, these plans handle backups and updates for you. Kinsta and WP Engine are two well-known providers in this space.
When you compare hosts, look at storage space, monthly bandwidth, loading speed, and how friendly their customer support is.
Step 5: Design Your Website’s Layout
First impressions matter, and your site’s design is the first thing visitors will see. Crafting a clear and attractive layout helps keep them around longer.
Essential Design Tips
- Keep it clean and clutter-free. Modern websites look best with lots of space and few distractions.
- Put user experience first. Menus should make sense, letters should be easy to read, and pictures should load fast.
- Dont forget mobile. More than half of all web visitors now tap in from phones.
- Use call-to-action buttons wisely. Simple phrases like Contact Me, Shop Now, or Sign Up tell users what to do next.
Most website builders give ready-made templates. Spend a little time mixing colors, fonts, and layouts until everything feels like your brand.
Step 6: Add Content
Every word and picture should serve a purpose, guiding visitors toward what you want them to do. Think of your content as a friendly tour guide, pointing people in the right direction.
Key Pages to Include
- Homepage: Your online welcome mat. Say who you are, what you do, and show the most important links right away.
- About Page: Tell your story. Sharing why you started adds a personal touch that builds trust.
- Services or Portfolio Page: Highlight your work or break down what you offer so visitors can see value quickly.
- Contact Page: Include a short form, your email, and links to social media, making it super easy for people to reach you.
Tip for SEO
Weave in keywords where they fit naturally, but never sacrifice flow. Also write clear meta descriptions and title tags- they boost search rankings without extra work.
Step 7: Test and Optimize
Before you hit publish, give your website a thorough test to make sure it runs like a well-oiled machine.
- Check for Broken Links – Click every button and follow every URL to catch any dead ends.
- Optimize Loading Speed – Run a quick speed test with Google PageSpeed Insights; slow sites chase visitors away.
- Mobile Responsiveness – Peek at your site on phones, tablets, and desktops to verify that everything lines up nicely.
- Proofread Content – Scan for typos and awkward phrases; tiny errors can shake customers trust.
Once your own eyes are satisfied, ask friends, coworkers, or beta testers for fresh opinions on look and feel.
Step 8: Launch Your Website
When all the fixes are in, give the Publish button a firm press and let the world see what you built.
Post-launch Tips:
- Track Performance – Hook up Google Analytics so you can watch page views, clicks, and where visitors drop off.
- Regular Updates – Swap in new content, write a blog post, or tweak colors every few weeks to keep things lively.
- Promote via Social Media – Blast out links on Twitter, Instagram, and Facebook; a few shares can spark big traffic spikes.
From Dream to Reality
Creating a website from the ground up is thrilling. Your idea goes from a rough sketch in your notebook to a page anyone can visit.
Following this guide has turned that blank screen into a clean, working site. You set up the menus, picked colors, and even added a contact form-you should be proud.
Websites dont sit still, and neither should you. Over time, you may tweak the layout, post fresh articles, or plug in a cool tool. Just keep your goal clear and move one update at a time.
Ready to dive in? Pick your favorite builder, snag a domain name, and hit publish-before the next big idea slips away!

